Showing posts with label 微縮模型製作. Show all posts

Friday, November 15, 2013

Dark Sword Elven Princess mini diorama

This set was done a while back, it was the first finished piece since I got the air brush, but before I learned more about using it.  So here I haven't done much air-brushing except for  putting in shadows around the edges and behind the pillars.  I guess the mini would loo a lot more dramatic if I do a better job with the dress.


Darksword miniatures are very good at getting the proportion of the human body right, except they all got very thick legs.  When it comes to legs I guess other brands do it a lot better, like McVey or Meow.  The best part when paint her is her bosoms, they look real and very easy to paint.   I haven't spent enough time on the mini dragon and the book stand though.


If I were to name this piece I'd call it 'Distraction'.  The fun part of making diorama is trying to figure out how all the pieces fit together and how the rest of the scene complement it.  I had a lot of fun making this.


Thursday, November 14, 2013

Sophie base coating - Reaper LE Sci-fi Sophie diorama WIP

Finally after weeks of working on this Sophie herself makes an appearance! So let's give Yotsuba a bigger break.  I did this all in one night (ie 1.5 hrs) so a big pet on the back for myself.  I guess at this rate I can finish a table top quality mini in about 2 nights... (next up, massive BONES painting haha)  Anyhow this is how far I got, really not bad if I may say so myself.


Took me a while to decide on the color scheme, but I guess it works out.  I think the hair looks fine, give a good contrast against the blue suit.  I'd give it a brown wash and bright red highlights, although that would be challenging as some of the hair gets very close to the face.... next time I really should do a better and more complete base coat for the hair before starting on the face....

I think the armor plates works, it was painted with Reaper Terran Khaki (09122).  I am lazily relaying on using the Khaki paint set for anything that's white or light color.  The best part of the set is the variation you can get out of it: if I want it to appear whiter I just add more highlights, and if I want it darker towards grey I just put in more shadow.


And yes, the eyes. Look at her eyes.  Dotting the eye is something that I had practices so many time for so long.  These are easy to do bigger eyes, so it was very easy for me.  Lips was good with a bigger lower lips so the catch light on the lips is easier to put on.  Notice I haven't put up a close up of her face coz I haven't figure out the highlights yet and there are a lot of annoying tiny spots that I missed on her hair, where the grey prime is showing... Next time I would definitely do a pure white overall highlight on the prime before starting to paint.


Monday, November 4, 2013

Painting Nasmat remotes - Reaper LE Sci-fi Sophie diorama WIP

Hi everyone I am back! Such a short break is it?  Well this time around it's finally brush to miniature (instead of pen to paper) with my diorama!  We can finally moved on from the base to the miniatures!


The ferret hasn't been painted yet but the remotes are pretty much done! We'd need to put on the final highlights depending on the over all looks of the set up, but for now they are pretty much ready.  Took a lot shorter than I thought.


So, this is how we started, we spray painted the primer on and used dark and light paint air brushing to get the shadows and lighting right.  Although they actually look better with just the dark and light air-brushing, I believe some day I would be just as good with the lighting effect... I'd just have to understand color and paint mixing better...


Learning from my mistake, this time the 'light' paint isn't purely white but actually it's a light purple.  That is because painting whitish color is hard for me as I tend to over paint it.  So with this air-brushed light pink it could bring out the whitish highlight color easier.


I am following a color scheme that I found on line, instead of using the box art.  I am planning to use the same blue-red-khaki color scheme on Sophie... when I finally get to paint her this week..


I had applied a very focused and careful wash to the recesses of the ferret, and all its features got a lot more apparent.  Again, well done Reaper for such a fine tiny metal miniature.  (yes, metal, not BONES ;) )


The fun part, I guess, is to place them on to the base. I learned the hard way that all these elements are suppose to be pinned, not just glued, to the base.  So what I did is I drilled a bigger hole, put green stuff in the hole, and press the pin to the green stuff, with a bit of glue to its feet.


And of course, the whole point of the base is to let the Remote lock gaze with the Ferret.  so I had to check several times that their gaze met.


Notice how I haven't took a close up shot of them? that is because I haven't really completed painting them so I am saving the close up shots for later :)

bye for now :)


Tuesday, October 29, 2013

Floaking, Reaper LE Sci-fi Sophie diorama base

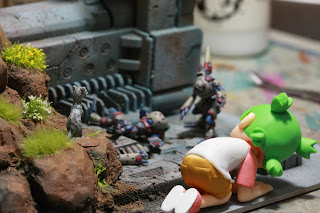
Hi everyone. It seems that Yotsubato is bringing in a lot of traffic to my blog, so here's she again. Say hi Yotsubato.


I think all the modeling of the base is very much done, so it's time to put some finishing touches to it.  To make the rocks look natural, it's time for flocking.  I noticed in real life that grass grows better from bigger gaps or cracks between the rocks.  When unattended, smaller plants instead of grasses will grow too.  To recreate that I put white glue between the cracks and then sprinkle these fabrics down there.


Next I used these ready-for-use small stubs of flowers and tall grass on the flatter area of the rocks.  I imagine that before the land slide they would have been growing grass, so I would imagine the grass will keep on growing.

Here are some close up shots of the grass and the flowers, beautiful isn't it.


As good as these grasses are, I still have to trim them so that they look less like they are just bursting out of flat ground in a fan shape.


Later on I'd post some better shots of the set up, and there's Yotsubato, complaining that there are still no miniature on the base after about 10 entries....

"Where are the miniatures??"

Friday, October 18, 2013

Reaper KS Urban Legend Sophie - Done - (NSFW)

Well, I did my best but seems there still a lot could be done.  The worse part is that I was away for two weeks and left her out cold for so long, so I had left out some important steps and got some sequence wrong. But I guess this is really already my latest best, using almost all of the equipment and techniques I learned through out the years.  All in all, I'd give myself a B+


So I guess I better post some 'money shots' up front, here are photos of her chest.  Personally I would prefer the version with armor but this one works too. This is the first time for me to paint a nude mini, and so this is the first time I painted nipples.  Having seen a lot of these (I am a guy, okay?) I think I did a pretty good job.


Well this is a personal blog so I'd be honest with the photos.  I had decided to paint her eyes closed because the sculpt was cast this way, I tried painted it was an opened eye and it looks very odd.  The other eye is VERY hard to paint because of the hair.  So if you look closer, it doesn't turn out well.
And as far as honesty goes, I haven't done a good job with the hair too.  I guess I should have air brushed the hair, and give her body a flesh tone base coat as well...


Again, being a guy and having seen a lot of the back side, I think I did pretty good.  Although I haven't sand the surface a lot it's still reasonably smooth.


The wings looks fine, I believe.  This is the first pair of wings I painted because usually I just forget about the wing and fill the hole on the back.  Since this mini isn't mine so I have to keep it on.  As it turns out, the wings really did give her a lot of character.


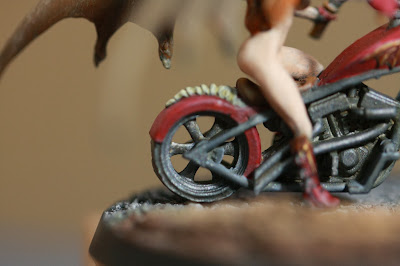
First time ever painting of a motor bike, I guess I can make it a lot more 'shinny'.  I like how the wings turns out though.


I guess with basing it's all the little details that matters.  I placed an hand axe on the ground so that there's a reason for her to look down and to the left.  There's actually some skid mark on the ground but I haven't done a good job with that.  The flocks are actually ready made so that look so real, but I think I did pretty well with the ground as well. 


Related Posts Plugin for WordPress, Blogger...